
How to get your die-cut letters and sentiments straight every time!
One of the most frustrating things about crafting can be wobbly and uneven letters and sentiments on your cards and projects, so in this tutorial we're going to look how to get them straight every time!
You can watch the tutorial, or if you prefer, keep reading for step by step instructions with pictures.
Step One - Make your Sticky Roll Board!

Take a sheet of thick card, (for mine I use 300gsm/110lb) and either print the lines from the free downloadable PDF or, if you don't have a printer, simply draw lines in pencil at 1.5cm or 10/16ths of an inch intervals, for the length of the card.

Unwind your Sticky Roll and place the side with the lines on face down on to the sticky side, cut away from the roll and then trim off any excess.
Give it a good burnish to remove any air bubbles, and there you have your Sticky Roll board ready to use!
Step Two – Cut out your letters and sentiments using Sticky Roll

The letters and sentiments to be used with this board have been cut using either dies or a cutting machine (Scan n Cut/Cricut/Silhouette) from card that has been backed with Sticky Roll. This will enable you to line them up perfectly on the board and then stick them straight down onto your card/project without any messy glue splodges.
Letters

Mark out your workspace

Using finger lift or double sided tape, mark out the border lines of the project/card you want to line up on the board, so you know exactly how much room you have to work with.
Line up your letters

Place down any other embellishments on to your Sticky Roll Board within the tape guides, and then start to arrange your letters using the lines on the board.
Remove the Liner

When you are completely happy with their placement, you can start peeling away the Sticky Roll liner from the back of the letters, and place them down straight on to the board. I tend to start with the first and last letter of the word, and then it’s just a matter of filling in the gaps in the middle.
If at any point you are not happy with how you have placed a letter down, you can simply lift it up and adjust it until you are completely happy, which is the beauty of the Sticky Roll Board.
Apply Transfer Roll

Lift And Apply Your Letters!

Place the piece of Transfer Roll straight down on to the letters, burnish, and then lift the sheet back up, bringing the letters with it.
If the letters need a bit of help lifting from the Sticky Roll Board, just give them a little bit of a poke as you are lifting up the Transfer Roll.
Position the sheet where you’d like the words to go on your card/project, place it down and rub your fingers over the letters.
Peel away the Transfer Roll and your letters will remain in place, straight and in perfect alignment! Hurray!
Re-wind the Transfer Roll piece back on to your roll as it will be good for another few uses on other projects.

Sentiments

Use the Negative as a Template

Use the negative of the shape you are applying the sentiment to as a template, this will enable you to accurately line up the sentiment on the Sticky Roll board. Secure it in position on the board with double-sided or finger-lift tape.
Place and Arrange Your Sentiment

Place your sentiment down inside the template and have a little play with it until you’re completely happy with its positioning.
Remove the Sticky Roll Liner

Use a pair of tweezers or a craft knife to remove the Sticky Roll liner from the back of the sentiment, and pop it back in to position on the board. Try not to press it down too hard, as we down want to have to burnish it too much when we’re picking it up with the Transfer Roll.
Lift and Apply Your Sentiment
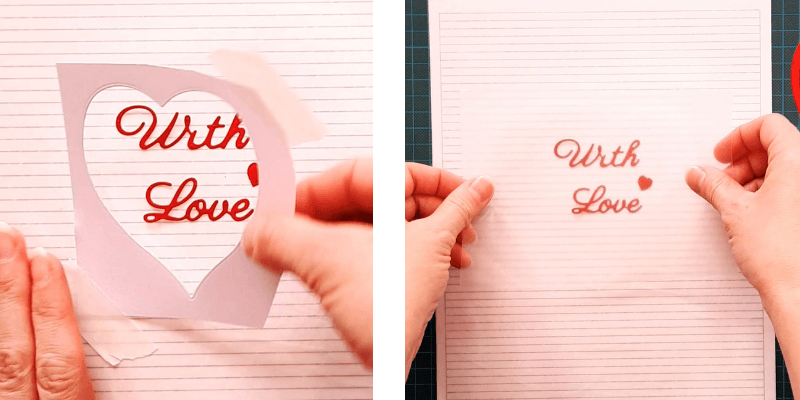
Remove the negative, and using the piece we used for the last project, place it over the sentiment, burnish, and lift away the Transfer Roll.
Line up your sentiment on the tag, smooth it down with your finger, and peel away the Transfer Roll. Again, re-wind the Transfer Roll piece back on to your roll, as we can keep using it until it’s lost its tack.

Peel Offs
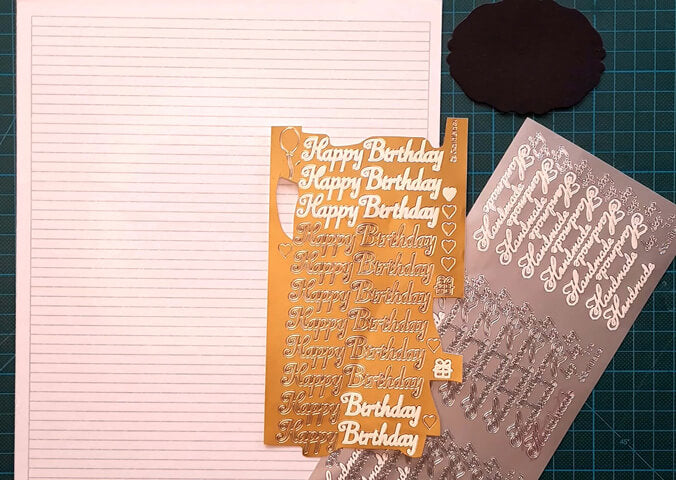
Now we don’t see Peel-Offs quite as often as we used to, but I still think they look good, especially as words or sentiments. They can be a little bit tricky to get them lined up correctly, and one of the original ways I used my Sticky Roll Board was to get them in perfect alignment at a much faster rate!
Remove your Peel-Offs

Using a pair of tweezers or your fingers, remove your peel-off and place it down on to the board using the lines to get them level and in perfect alignment with each other.
Lift and Apply your Peel-Off
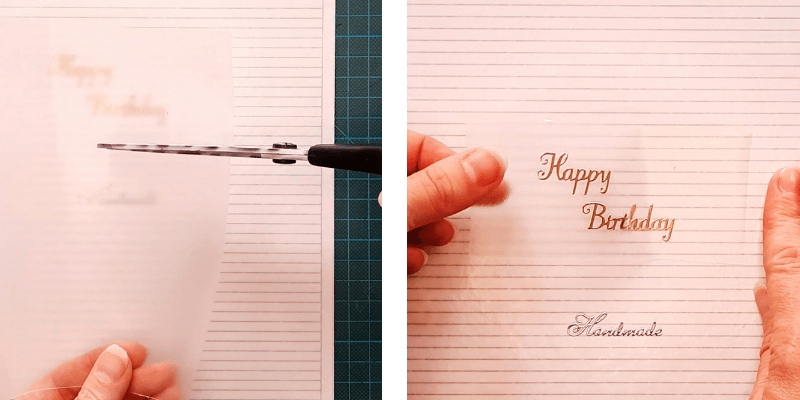
Take the piece of Transfer Roll we used for the last two projects, and trim this down to the correct size.
Apply the piece over the top of your peel off, sometimes the more you’ve used a piece, it can just need a bit more of a burnish, and if the peel off is being especially fussy, then simply give it a little lift from behind using a craft knife or pokey tool.

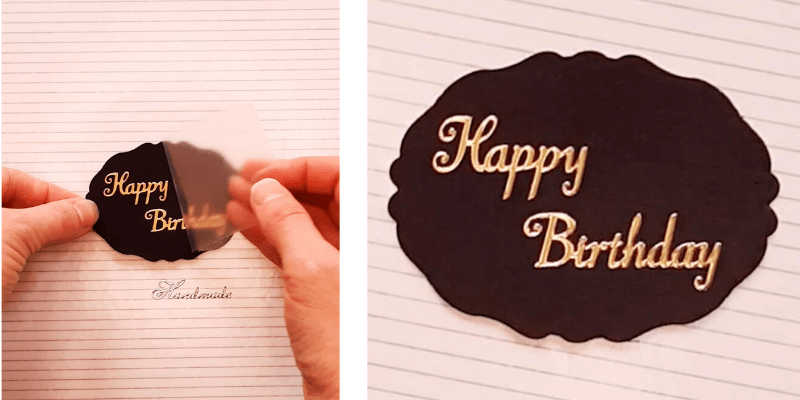
Pop this straight down onto your card or project, give it a quick rub, and peel the Transfer Roll away, leaving a perfectly placed, level and aligned peel off!
And there you have 3 simple, but effective ways of getting letters and sentiments level and perfectly aligned on your craft projects!
I really hope you enjoyed this tutorial and find it useful.
To make and use your very own Sticky Roll Board, you will need;
- Sticky Roll
- Transfer Roll
- Sticky Roll Board Free download
- Sturdy white card
If you do have a go at making your own board, I'd love to hear from you!
And if you'd like to find out more about all the super crafty things you can do with Sticky Roll please go to www.wildspiderdesigns.com or sign up to the Newsletter.
Happy Crafting!
Toni x